In summary:
- Weekend crowds at Kite Beach create a high-risk environment due to unpredictable skill levels and limited space, making it unsuitable for novices.
- Understanding wind conditions, especially the powerful Shamal, is non-negotiable for safety; some conditions are a strict no-go for beginners.
- Mastering the “rules of the road,” like the Starboard Tack Rule and non-verbal signals, is more critical for collision avoidance than pure kite skill.
- Equipment is your lifeline; a 5-minute pre-flight check on rental gear can prevent catastrophic failures on the water.
- Respecting designated zones for foiling, swimming, and jet skiing is mandatory to avoid serious accidents and hefty fines.
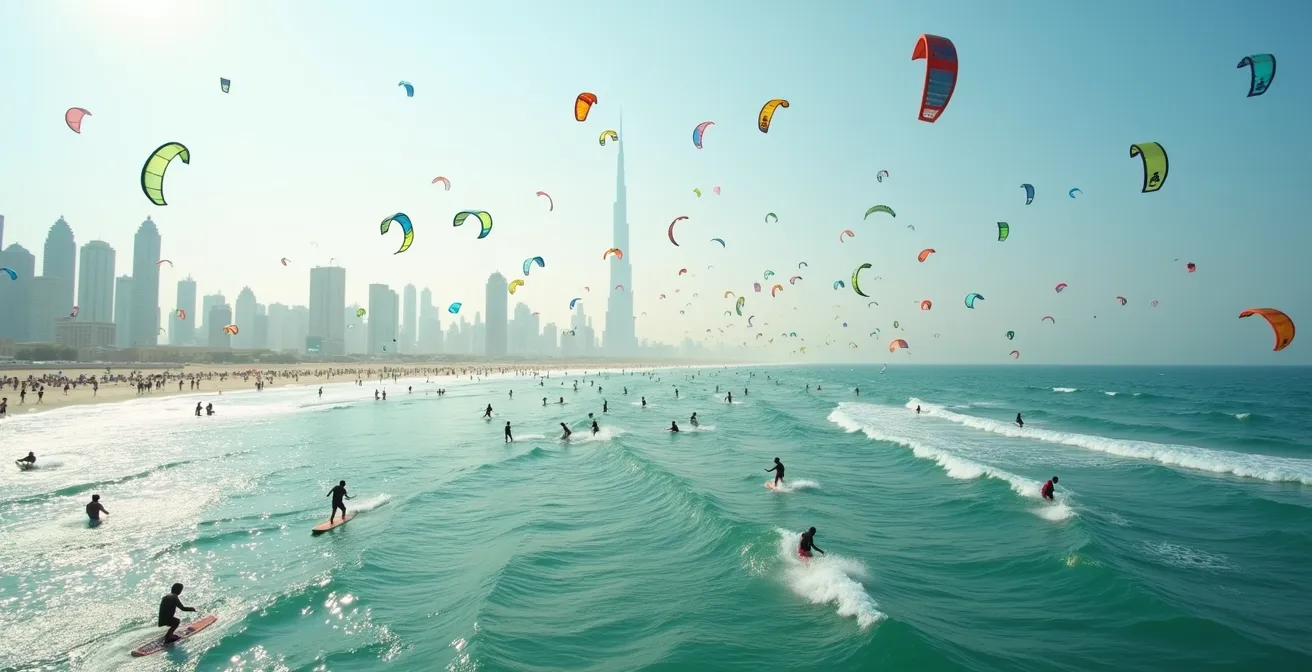
You’ve seen the incredible photos: a kaleidoscope of kites soaring against the backdrop of the Burj Al Arab. Kite Beach on a windy weekend looks like the ultimate kitesurfing dream. But for a beginner, that dream can quickly become a nightmare. The sheer volume of riders, combined with varying skill levels and complex wind patterns, creates an environment where a small mistake can have serious consequences. Many guides will teach you how to get up on the board, but they often neglect the most critical skill of all: situational awareness.
The common advice is to just “go for it” and “watch other kiters.” This is not only incomplete but dangerously simplistic. The real key to progressing safely at a world-class spot like Kite Beach isn’t just about controlling your own kite; it’s about learning to read the water, understand the unwritten social contract of the community, and anticipate the movements of dozens of other riders simultaneously. It’s about developing a form of “water literacy” that turns chaos into a predictable pattern.
This guide takes a different approach. We won’t just cover the “how-to”; we will focus on the “why” and “when.” We’ll move beyond the basics of launching and landing to delve into the dynamic risk assessment required to navigate a crowded weekend. We’ll decode the subtle environmental cues and social signals that separate a safe session from a trip to the emergency room. This is your instructor-led course in surviving and thriving as a beginner at one of the world’s most iconic—and challenging—kitesurfing locations.
To help you navigate these complexities, this guide is structured to build your awareness from the ground up. We will explore everything from understanding the powerful local winds to the unspoken rules that govern the water, ensuring you have the knowledge to make smart, safe decisions every time.
Summary: Why Kite Beach Can Be Treacherous for Novices
- The Shamal Winds: When is the Best Month for High-Speed Kiting?
- Old Lines and Torn Kites: How to Spot Dangerous Rental Gear?
- Starboard Tack Rule: How to Avoid Collisions in Crowded Waters?
- Where to Store Your Gear Monthly if You Live in an Apartment?
- Why Foiling Is Banned in Shallow Swim Zones?
- What Happens to Your Booking if Wind Speed Exceeds 15 Knots?
- FlowRider for Beginners: How to Stay Up for More Than 3 Seconds?
- How to Avoid a $500 Fine When Jet Skiing Near the Burj Al Arab?
The Shamal Winds: When is the Best Month for High-Speed Kiting?
Understanding the wind at Kite Beach is the first and most critical step in your safety checklist. The conditions are not uniform throughout the year. The most famous, and most powerful, are the Shamal winds. These northwesterly winds are strongest from December to February, often bringing high speeds perfect for advanced riders seeking big air and high-speed runs. However, for a beginner, this is the most dangerous time of year. Experienced local kiters report that during a Shamal event, winds can easily reach and exceed 20 knots, creating conditions that are unforgiving of any error.
Your goal as a novice isn’t high speed; it’s control. The most predictable and therefore safest winds are the afternoon thermal winds, which typically build to a manageable 12-15 knots. This is the ideal learning window. Anything above that, especially with the gusty nature of a Shamal, dramatically increases the risk of being overpowered, losing control of your kite, and being a danger to yourself and others. A critical danger zone to be aware of is the sudden wind drop at sunset. You must be out of the water at least 30 minutes before sunset to avoid the risk of your kite falling from the sky, leaving you stranded and requiring rescue.
Old Lines and Torn Kites: How to Spot Dangerous Rental Gear?
On a busy weekend, rental shops are under pressure, and sometimes, worn-out equipment can slip through the cracks. As a beginner, you are entirely dependent on your gear functioning perfectly, especially the safety systems. Never assume a rental kite is safe to fly. You must perform your own pre-flight inspection every single time. A catastrophic equipment failure on a crowded day doesn’t just end your session; it can cause serious injury to you or someone downwind.
Look for subtle but critical signs of wear. Sun and salt are brutal on equipment. Check the lines for fuzziness (abrasion), significant discoloration (UV damage), and stiffness, all of which indicate compromised strength. Pull the depower rope through its full range to feel for sand buildup that could cause it to jam. Most importantly, test the quick-release safety mechanism. It should activate with a crisp, smooth action. If it feels gritty, sticky, or mushy, it’s likely contaminated with sand and cannot be trusted. Do not take it on the water. A professional patch on a kite canopy is normal, but be wary of DIY tape repairs, which can alter the kite’s flight characteristics and fail under load.

As this image highlights, the difference between a safe line and a compromised one can be subtle. The textural degradation, fiber separation, and color fade are all red flags that are easy to miss if you’re in a hurry. Taking five minutes for a thorough check is non-negotiable.
5-Minute Pre-Flight Safety Checklist for Rental Equipment
- Check safety release mechanism: Pull the quick release to ensure it activates smoothly without sticking or grittiness.
- Inspect all four/five lines for: discoloration (UV damage), fuzziness (abrasion), and stiffness (compromised strength).
- Test depower rope: Pull through completely checking for sand buildup or slippage under tension.
- Examine control bar: Feel for crisp safety release action versus a mushy/gritty response indicating sand contamination.
- Check bridle connections: Look for knots, twists, or uneven wear at attachment points and inspect the kite canopy and bladders for unprofessional repairs.
Starboard Tack Rule: How to Avoid Collisions in Crowded Waters?
On a packed weekend at Kite Beach, the water becomes a complex, three-dimensional traffic system. Simply knowing how to ride is not enough; you must know the “rules of the road” to avoid collisions. The most fundamental of these is the Starboard Tack Rule. When two kiters are on a collision course, the kiter with their right hand and foot forward (riding towards the right) has the right of way. The kiter on the port tack (left hand and foot forward) must give way, either by changing course, slowing down, or bringing their kite higher to pass safely behind.
However, official rules are only part of the story. Kite Beach has an unwritten social hierarchy. For instance, a rider on a wave has implicit priority over someone just cruising. More importantly, everyone must give a wide berth to a struggling kiter who is downwinding or trying to relaunch their kite. Freestylers attempting tricks also need a large safety buffer. A good practice is the ‘3-Second Bubble’ rule: maintain at least three seconds of travel distance from other riders. This means you must make your course corrections early and obviously to signal your intentions, preventing last-second panic maneuvers. Non-verbal communication is also key. A simple pat on the head means “I’m coming in to land,” signaling others to clear the area.
Your Action Plan: Non-Verbal Communication Signals at Kite Beach
- Patting the head: Signals ‘I’m coming in to land’—clear the landing zone.
- Circling hand overhead: Indicates ‘I’m going to loop’—expect sudden kite movements.
- Pointing to water: Means ‘I’m going down’—be ready to offer assistance.
- Waving arm side to side: A clear sign for ‘Give me space’, often used by novices in trouble.
- Thumbs up after a water start: Confirms ‘I’m OK’—no help needed.
Where to Store Your Gear Monthly if You Live in an Apartment?
For residents of Dubai, especially those in apartments, storing bulky kitesurfing gear presents a real logistical challenge. Leaving wet, sandy gear on a balcony can lead to humidity damage, mold, and premature aging of your equipment. Storing it inside takes up valuable living space and can be messy. Fortunately, the local kitesurfing community has developed several practical solutions, each with its own trade-offs in terms of cost, convenience, and security.
Your main options range from dedicated self-storage units to on-site school lockers. A self-storage unit in a nearby area like Al Quoz offers climate control and 24/7 access but requires a 20-30 minute drive to the beach. Storing your gear directly at a kite school on the beach is the most convenient option, often including maintenance services, but comes at a higher monthly cost and with limited access hours. A popular compromise is sharing storage space in a nearby villa with other kiters, which is cost-effective and fosters a sense of community, though it may raise security concerns. Your choice depends on your budget, frequency of riding, and tolerance for travel time. A clever tip for travelling kiters is to use a bag marked ‘GOLF,’ as many airlines have more lenient policies for golf equipment, which can save on excess baggage fees.
This comparative table helps break down the decision-making process, allowing you to weigh the pros and cons based on what matters most to you.
| Storage Option | Monthly Cost (AED) | Distance to Beach | Pros | Cons |
|---|---|---|---|---|
| Self-storage Al Quoz | 300-500 | 20-30 min drive | 24/7 access, climate controlled | Extra travel time, fuel costs |
| Kite school storage | 400-600 | On-site | Direct beach access, gear maintenance included | Limited access hours, higher cost |
| Shared villa storage | 200-350 | 5-10 min | Community network, lower cost | Security concerns, access coordination |
| Home apartment | 0 | Variable | Free, full control | Space issues, humidity damage risk |
Why Foiling Is Banned in Shallow Swim Zones?
The rise of hydrofoiling has brought a new dimension to kitesurfing, but it has also introduced new dangers, particularly in crowded, shallow waters like Kite Beach. The reason for banning foils from designated swim zones and beginner areas is based on simple, unforgiving physics. Unlike a traditional twin-tip board that skims across the surface, a hydrofoil has a long mast that extends deep underwater, like the hidden part of an iceberg. This creates a significant “draft” that can easily snag on the seabed in shallow water, causing the rider to “trip” and fall at high speed.
This risk is compounded by the foil’s massive turning radius, which can be 3 to 4 times larger than that of a twin-tip. In a crowded area, a foiler simply does not have the agility to make the sharp, sudden turns needed to avoid a collision with a swimmer or a fallen kiter. This makes them incompatible with high-density beginner zones where people are frequently in the water. While foilers often move to less crowded spots like Jumeirah on light wind days, they converge at Kite Beach during strong winds, increasing the need for strict zone enforcement to ensure everyone’s safety. For a beginner, the key takeaway is to stay well clear of foilers and understand that they are less maneuverable than you might think.

The visual difference in draft between a foil and a twin-tip, as shown here, makes the danger immediately apparent. What appears to be safe, open water for a twin-tip can be a treacherous minefield for a hydrofoil.
What Happens to Your Booking if Wind Speed Exceeds 15 Knots?
You’ve booked your first lesson, you’re excited, but the forecast shows winds gusting to 18 knots. As a beginner, your lesson will almost certainly be cancelled. This isn’t your instructor being overly cautious; it’s a decision dictated by insurance liability. Most kite school insurance policies strictly prohibit beginner lessons in winds above 15 knots. Data on local conditions shows that while strong winds are common for experienced riders, only about 20 sessions per year above 15 knots are suitable for lessons, highlighting how rare perfect learning conditions can be.
So, what are your rights? A full refund is rare unless you are a tourist with proof of imminent departure. The standard procedure is to offer you credit for a future lesson. However, don’t see this as a wasted day. You have options. Ask your instructor for a discounted “ground school” session. This is an invaluable opportunity to focus on theory: mastering your safety systems, understanding the wind window in detail, and practicing self-rescue techniques on the beach. Furthermore, discuss the conditions in more detail. A steady 18-knot onshore wind can sometimes be safer for certain drills than a gusty 14-knot offshore wind. Most schools have a 24-hour weather window, allowing you to reschedule free of charge based on the official forecast, so always check ahead.
Your Rights and Options for Wind-Related Lesson Cancellations
- Postponement vs. Cancellation: Expect credit for future lessons; full refunds are typically reserved for departing tourists.
- The ‘Ground School’ Alternative: Request a discounted theory session on safety systems, wind theory, and self-rescue.
- Direction Over Speed: Discuss the wind’s gust factor and direction with your instructor, as these are as important as speed.
- Insurance Liability Reality: Understand that cancellations are driven by strict insurance policies, not the instructor’s personal judgment.
- 24-Hour Weather Window: Utilize the policy of most schools to reschedule without a fee if you notify them 24 hours in advance based on the forecast.
FlowRider for Beginners: How to Stay Up for More Than 3 Seconds?
A frustrating reality for aspiring kitesurfers is the lack of wind on a perfect weekend. However, this doesn’t have to be wasted time. The FlowRider at Kite Beach is more than just a fun attraction; it’s a powerful and direct training tool that can dramatically accelerate your board skills. It acts as a “kite simulator,” allowing you to develop the crucial muscle memory for edging a kiteboard without having to manage a powerful kite at the same time.
The secret to staying up for more than a few seconds is to replicate the kitesurfing stance: keep about 70% of your weight on your back foot and keep your arms relaxed and out to the side for balance, not for steering. The most common mistake is looking down at the board, which instantly throws you off balance. Instead, fix your eyes on a point at the far end of the machine. This forces you to use subtle hip and ankle movements for control, exactly as you would on a kiteboard. Once you master the basic stance, you can practice the heelside-to-toeside transition, a notoriously difficult skill in actual kitesurfing. Strategic use of the FlowRider on no-wind days will pay huge dividends during your next water lesson.
FlowRider as Direct Kitesurfing Training Tool
The FlowRider serves as an ideal ‘kite simulator’ for developing the muscle memory crucial for kitesurfing. The core skill of maintaining back foot pressure while using subtle hip and ankle movements for control directly translates to edging a kiteboard. A key breakthrough for most learners comes from keeping their eyes fixed on a point ahead rather than looking down at the board—a mistake that causes immediate falls on both the FlowRider and when kitesurfing.
Key takeaways
- Weekend crowds are your biggest threat; prioritize space and predictability over ideal wind.
- Your equipment’s safety system is your last line of defense. Check it yourself, every time.
- Rules of the road are a social contract. Knowing them protects you and the community.
How to Avoid a $500 Fine When Jet Skiing Near the Burj Al Arab?
While this guide focuses on kitesurfing, overall water safety at Kite Beach means being aware of all activities, including jet skiing. The Dubai Maritime City Authority (DMCA) enforces strict exclusion zones to prevent accidents between high-speed jet skis and other beach users. Ignorance of these zones is not an excuse, and violations come with significant penalties. The area around the Burj Al Arab and other hotel beaches is particularly sensitive.
The rules are clear: jet skis must maintain a buffer distance of at least 300 meters from designated swimming areas and 500 meters from hotel beaches like the one fronting the Burj Al Arab. Entering these restricted zones will result in a fine. According to the DMCA, fines for entering restricted zones range from AED 500-1,500 for a first offense. These zones are actively monitored by DMCA patrol boats and the Coast Guard. As a kitesurfer, this is important for two reasons. First, it defines the areas where you are less likely to encounter a speeding jet ski. Second, it underscores the importance of a safety-first, rule-following culture that applies to everyone sharing the water.
Respecting the rules isn’t just about avoiding a fine; it’s about contributing to a safe and enjoyable environment for every single person at the beach, from swimmers and paddleboarders to fellow kiters and jet skiers. Understanding these boundaries is a fundamental part of the shared responsibility on the water.
| Zone Type | Location | Buffer Distance | Fine (First Offense) | Enforcement |
|---|---|---|---|---|
| Swimming Areas | Kite Beach designated zones | 300 meters | AED 500 | DMCA patrol boats |
| Hotel Beaches | Burj Al Arab, Jumeirah Beach Hotel | 500 meters | AED 500 | Coast Guard |
| Boat Channels | Fishing harbor entrance | 200 meters | AED 500 | Harbor Authority |
| Private Property | Beachfront villas | 100 meters (unofficial) | Warning/AED 500 | Beach Security |
Now that you understand the rules, the risks, and the culture of Kite Beach, the next step is to put this knowledge into practice. A safe kitesurfer is an aware kitesurfer, one who constantly assesses their environment and makes conservative decisions, especially on a crowded weekend.